Application Isolation using NixOS Containers
Nowadays, if you use a computer, you are likely to run untrusted code and work with untrusted data. Everyday scenarios include executing a JavaScript code in a browser and opening an email in an email client. While any modern web browser and email client will provide some sandboxing, this is not a general case for most software. I find software development to be particularly risky because, as software developers, we tend to use various third party code from public repositories.
In this post, I’m describing an approach to sandboxing specific to the NixOS. I found it surprisingly easy and flexible, so I thought that I might write about it. :)
Please be aware that the risks described above are not theoretical.
There were cases where attackers introduced malicious code to a public repository.
Or when legit software decided to wipe / directory due to a bug.
I think it’s safe to assume that something alike will happen again in the future.
As a software developer, I want to sandbox my environment, so an IDE, build tools and software I write, do not have access to my documents and other projects. In this post, I will show you a solution that I found acceptable both from a security standpoint and comfort of use. The approach is generic: it enables isolating development workflow and any software, such as browser or email client.
Keep in mind that the security standpoint refers to my requirements. I’ll try to emphasize potential attack vectors, but I’m not a security expert.
I have tested multiple approaches to this problem, and the one mentioned in the title works best for me so far. For completeness, let me list my requirements and tried solutions. Yours are undoubtedly different, so keep that in mind. ;-)
Requirements 🔗
- Isolated filesystem — files from the host (especially
/home) should not be accessible by development tools unless explicitly allowed. - Support IDEs I like — I want to use tools that enable me to work efficiently. Most notably, I like IDEs from JetBrains (IntelliJ Idea), so its support is my must-have.
- Performance — I’m sensitive to latency when typing. Any solution with noticeable latency will annoy me, and in the end, I won’t be using it.
- Consistent settings — it would be nice to have a similar configuration (shell, shortcuts, etc.) in every project.
- Multiple projects — it should be possible to work with numerous isolated projects with minimal effort. Projects should not be aware of each other.
- Various machines — it should be possible to keep similar environments on multiple physical devices with minimal effort.
Tested solutions 🔗
Separate virtual machine for each project 🔗
It’s the most straightforward approach if you want something quick. In addition, it provides excellent isolation between host and guest. (Boundary between both machines is well-defined.)
However, it has two caveats: performance and consistent settings.
While consistent settings can be achieved through some configuration tools, be it Ansible or NixOS config, the performance problem is pretty complex.
The most critical factor is graphics performance, and in my experience, it is the hardest to solve.
Although VGA passthrough is possible (I have been gaming in VM using such setup), it is hardware-specific, and in my experience, it had some quirks even when it worked.
In other cases, we are stuck with virtio-gpu which is nice, but I did feel input lag when using it with IntelliJ Idea.1
Also, other factors, such as block device configuration, are non-trivial to configure and may affect performance.
Remote development 🔗
Probably mostly known thanks to built-in support in Visual Studio Code. Not everyone knows that JetBrains offers a similar solution for their products and, in theory, any Java application. JetBrains Projector enables running IDE on any network-accessible computer (local VM, container, remote VM) and uses it through a web browser or native app.
I’m really looking forward to this project. However, I had some rendering issues at this point, so I will wait till it matures. The input latency has impressed me: it was surprisingly good even with emulated network throttling in Firefox.
I kind of believe that remote development is the future of software development. Its perfect implementation would allow seamless development from a workstation, an iPad, and a smartphone with an external screen and keyboard (think of Linux On Dex / Samsung Dex). Imagine a world where developers do not need to carry a notebook because a smartphone connected to a docking station gives you everything necessary. ;-)
Other 🔗
Most of my approaches can be classified as one of the previous points. If you are interested, you can also look at:
- Spectrum — Nix-based OS similar to Qubes OS. However, instead of doing everything inside a virtual machine, this project attempts to leverage Wayland’s capabilities to run graphical applications with native performance and secure them using solutions similar to Chrome OS.
- RDP — in my experience, too slow for any real work.
- Docker / Podman — not designed for this use-case which results in complexities in handling file permission (when sharing with the host). Not every tool can be easily configured during container build, which results in an additional state that should be preserved when we want to update the container. Quickly gets very complex.
- Flatpak / Snap — a lot of applications have almost no isolation from the host. Most, if not all, development tools have access to files in
/home(sometimes with a deny list). Also, it’s difficult to create multiple instances of the same application for various contexts (think of working on projects for another client using the same IDE).
NixOS containers 🔗
This is what this post is all about. I’ll show you how to create isolated environments using declarative containers. You can see the final result in the following video:
Let’s start!
High-level design 🔗
The basic idea is to build several containers with a configuration similar to the host but with a few tweaks:
- A container has a different set of applications. Some of them may be the same as in the host (usual stuff like a terminal emulator,
jq, etc.), and others may be completely different (VSCode installed only inside a container). - A container does not run compositor. Instead, it uses one provided by the host, through the Wayland socket or X11 socket.
- A container does not manage any secrets nor have root / sudo access. It means that any substantial change to container configuration has to be done from the outside. Also, any, for example, git operations, commit signing, etc., should be done from the host.
If we visualize it, we may think of the following picture:

Blue rectangles represent — somewhat abstract — structure of Nix configuration parts.
I try to reify it by associating every blue rectangle/part with Nix modules.
Remember that there is only one configuration.nix for the host, and containers are part of the host configuration.
Nonetheless, I find this logical separation easier to reason about.
Implementation 🔗
I assume that you already have basic NixOS knowledge, so I won’t describe splitting configuration into multiple files.2
In my setup, I have a desktop.nix and a desktop-host.nix.
The first one contains the common configuration, which I expect to be consistent across all machines/containers/VM-s, and the second one should be applied only to the host.
An important aspect of consistent settings across host/containers is dotfiles configuration. While NixOS, by default, provides excellent means to configure “global” things, it lacks options to configure software per user.3 Fortunately, this problem has been solved by the Nix community through Home Manager.
Automatic home dotfiles configuration through the Home Manager 🔗
Usually, a user manually runs Home Manager.
However, in the case of automatically configured containers, we would prefer to avoid manual work, so after the nixos-rebuild switch, a new home configuration should also be applied.
I don’t think it is widely known, but we can achieve this through the following code in configuration.nix:
{ config, ... }:

let
  home-manager = builtins.fetchGit {
    url = "https://github.com/rycee/home-manager.git";
    ref = "release-21.05";
    rev = "35a24648d155843a4d162de98c17b1afd5db51e4";
  };
in {
  imports = [ (import "${home-manager}/nixos") ];

  home-manager = {
    users.myuser = {
      # standard Home Manager configuration
    };
  };
}
An important consequence of this approach is manual Home Manager version management. From time to time, we need to run:
nix-prefetch-github nix-community home-manager --rev release-21.05
and update revision.
This might be a problem because by default (as of July 2021), Home Manager uses private pkgs instance, which may result in using old software version by mistake.
One way to avoid this is to set the home-manager.useGlobalPkgs = true, which will tell Home Manager to use global pkgs configured on system level.
Base configuration 🔗
I’ve prepared a basic NixOS configuration upon which further work will be built. At this point, there is no configuration related to containers. It consists of several files to clearly separate configurations that should be common or host-only:
configuration.nix— configuration root, specific to the host machine.desktop-host.nix— system configuration consistent across machines but not present in the containers.desktop.nix— system configuration consistent across machines and containers.home-host.nix— home/dotfiles configuration consistent across machines, but not present in the containers.home.nix— home/dotfiles configuration consistent across machines and containers.hardware-configuration.nix— manually crafted file to allow easy testing inside a virtual machine.
For reference, here is the initial configuration that we will work on:
configuration.nix:
{ pkgs, ... }:

{
  imports = [
    ./hardware-configuration.nix
    ./desktop-host.nix
  ];

  networking.hostId = "12345678";
  networking.hostName = "isolationExample";

  system.stateVersion = "21.05";
}
desktop-host.nix:
{ pkgs, ... }:

let
  home-manager = builtins.fetchGit {
    url = "https://github.com/rycee/home-manager.git";
    ref = "release-21.05";
    rev = "35a24648d155843a4d162de98c17b1afd5db51e4";
  };
in {
  imports = [
    (import "${home-manager}/nixos")
    ./desktop.nix
  ];

  home-manager = {
    useGlobalPkgs = true;
    users.myuser = {
      imports = [ ./home-host.nix ];
    };
  };
}
desktop.nix:
{ pkgs, ... }:

{
  users.users.myuser = {
    uid = 1000;
    isNormalUser = true;
    initialPassword = "secret";
    extraGroups = [ "wheel" ];
  };

  fonts.fonts = with pkgs; [
    dejavu_fonts  # Default font used by Alacritty.
  ];
}
home-host.nix:
{ pkgs, ... }:

{
  imports = [ ./home.nix ];

  # Example user configuration that should not be present in a container.
  programs.git = {
    enable = true;
    userName = "My User";
  };

  programs.ssh = {
    enable = true;

    matchBlocks = {
      hostThatShouldNotBeKnownByContainer = {
        user = "secret";
        hostname = "doNotExpose";
        port = 2020;
      };
    };
  };
}
home.nix:
{ pkgs, ... }:

{
  programs.bash.enable = true;

  wayland.windowManager.sway = {
    enable = true;
    wrapperFeatures.gtk = true;

    config = {
      # Use Alt/Meta instead of Super to decrease the chance of conflict with host key mappings.
      modifier = "Mod1";

      # And use terminal with some sane defaults.
      terminal = "alacritty";
    };
  };

  home.packages = with pkgs; [
    alacritty
  ];

  gtk.enable = true;
}
hardware-configuration.nix:
{ pkgs, ... }:

{
  # In actual configuration, use file generated by nixos-generate-config.
  virtualisation = {
    writableStoreUseTmpfs = false;

    memorySize = "2g";
    qemu = {
      options = [
        "-vga virtio"
        "-display gtk,gl=on"
      ];
    };
  };

  hardware.opengl = {
    enable = true;
  };
}
To test this configuration, you can run:
# Build VM:
nixos-rebuild -I nixos-config=./configuration.nix build-vm
# Run VM:
./result/bin/run-isolationExample-vm
This command will create a result symlink with a configured virtual machine.
After invoking the second command, a QEMU window will appear, and the VM will boot.
You can log in as myuser with a password secret.
After that, try starting Sway window manager by running exec sway.
You should see an empty grey screen with a status bar at the bottom.
After that, start the terminal by pressing Mod1+Enter / Alt+Enter and shut down the machine with poweroff.
I must admit that I have encountered a bug with the mouse cursor inside QEMU. It was upside-down and had a vertical offset, so clicking was a bit harder. I’m not sure if it is specific to my machine, so you may or may not encounter such behavior. Either way: don’t worry. It won’t prevent us from testing container isolation. :-)
Running CLI applications inside the container 🔗
Let’s start with the simplest scenario: running a simple console application inside the container.
In the example, I will use vim because it allows editing files, so filesystem isolation can be easily verified.
All necessary changes have to be made inside desktop-host.nix.
The crucial part is:
{ pkgs, lib, ... }:

{
  # ...

  # (1)
  containers.cliExample = let
    userName = "myuser";
  in {
    config = {
      # (2)
      imports = [
        (import "${home-manager}/nixos")
        ./desktop.nix
      ];

      # (3)
      home-manager = {
        useGlobalPkgs = true;
        users.myuser = {
          imports = [ ./home.nix ];
        };
      };

      # (4)
      users.users."${userName}".extraGroups = lib.mkForce [];

      # (5)
      systemd.services.fix-nix-dirs = let
        profileDir = "/nix/var/nix/profiles/per-user/${userName}";
        gcrootsDir = "/nix/var/nix/gcroots/per-user/${userName}";
      in {
        script = ''
          #!${pkgs.stdenv.shell}
          set -euo pipefail

          mkdir -p ${profileDir} ${gcrootsDir}
          chown ${userName}:root ${profileDir} ${gcrootsDir}
        '';
        wantedBy = [ "multi-user.target" ];
        serviceConfig = {
          Type = "oneshot";
        };
      };

      # (6)
      environment.systemPackages = with pkgs; [ vim ];
    };
  };
}
That’s a rather large chunk of code so let’s describe what each part does:
- (1) Declare container
cliExample. No magic here at this point. - (2) Replicate shared desktop configuration by importing
desktop.nix. Also, import the Home Manager to enable its use inside the container. - (3) Replicate shared home configuration by importing
home.nixas Home Manager configuration. Again,useGlobalPkgsis specified to use the same packages as the host. - (4) Disable extra groups for the user. I do not want user inside the container to have access to the
wheelgroup. Even more: I am yet to find a use-case where I need access to any specific group inside the container! - (5) Unfortunately, Home Manager did not work inside the container due to missing
profilesandgcrootsdirectories for the user. These are not created on container startup (in the host’s nix store, you will findper-containerdirectories, which are then mounted inside containers). This systemd unit solves the issue by creating them. It could be improved by specifying Home Manager’s systemd unit inwantedBy, but depending onmulti-user.targetwas more straightforward, and I haven’t run into race condition yet. - (6) Customization to the container configuration, i.e., installing vim. :)
After rebuilding the virtual machine, we can log into it and try the following commands:
# Start the container:
systemctl start container@cliExample.service
# Enter shell inside container:
machinectl shell myuser@cliExample
(If you run these commands as a regular user instead of root, you will be asked for the user password due to polkit authentication.)
The first thing you may notice inside the container is a change in the shell prompt.
Hostname has changed from isolationExample to cliExample — this clearly indicates that we are inside the container.
The second thing you will notice when you try to run vim: it works perfectly inside the container and is missing on the host.
This means that configuration for the container is, in fact, different from the host’s configuration.
Another difference is the ~/.ssh/config file that is present on the host (because its configuration is in home-host.nix) and is missing in the container.
Exactly as planned!
However, if we look into, for example, ~/.config/sway/config, we will see that its contents are exactly the same on the host and inside the container.
This proves that we can specify if a configuration is shared or specific to the host/container.
Remember that even though the ssh config is not directly visible in the container, the file can still be accessed by the container.
Host and container share the same Nix store!
This is a strong reason not to store any real secrets inside the Nix store.
You can test it by invoking realpath ~/.ssh/config on the host and passing the result as an argument to the cat inside the container.
The third test is similar to the second and can be performed by simple vim ~/test-file inside the container.
(If you don’t like vim, you can use cat "test" > ~/test-file.)
The file will be visible only from the container’s shell.
This gives us hope that container cannot (easily) manipulate the host’s filesystem.
Extending the configuration to graphical applications 🔗
The primary goal was to run a graphical application inside an environment isolated from the host system but share some configuration parts.
Apparently, it is straightforward to achieve.
Again, let’s see changes in the desktop-host.nix:
{ config, pkgs, lib, ... }:

{
  # ...
  containers.graphicalExample = let
    hostCfg = config;
    userName = "myuser";
    userUid = hostCfg.users.users."${userName}".uid;
  in {
    # (1)
    bindMounts = {
      waylandDisplay = rec {
        hostPath = "/run/user/${toString userUid}";
        mountPoint = hostPath;
      };
      x11Display = rec {
        hostPath = "/tmp/.X11-unix";
        mountPoint = hostPath;
        isReadOnly = true;
      };
    };

    config = {
      # ...

      # (2)
      hardware.opengl = {
        enable = true;
        extraPackages = hostCfg.hardware.opengl.extraPackages;
      };

      # (3)
      environment.systemPackages = with pkgs; [
        vim
        jetbrains.idea-community
      ];

      home-manager = {
        useGlobalPkgs = true;
        users.myuser = {
          imports = [ ./home.nix ];

          # (4)
          home.sessionVariables = {
            WAYLAND_DISPLAY                     = "wayland-1";
            QT_QPA_PLATFORM                     = "wayland";
            QT_WAYLAND_DISABLE_WINDOWDECORATION = "1";
            SDL_VIDEODRIVER                     = "wayland";
            CLUTTER_BACKEND                     = "wayland";
            MOZ_ENABLE_WAYLAND                  = "1";
            _JAVA_AWT_WM_NONREPARENTING         = "1";
            _JAVA_OPTIONS                       = "-Dawt.useSystemAAFontSettings=lcd";
            XDG_RUNTIME_DIR                     = "/run/user/${toString userUid}";
            DISPLAY                             = ":0";
          };
        };
      };
    };
  };
}
First (1), we specify bind mounts from host to container. In this case, we are mounting the Wayland socket and X11 socket. If you have researched application sandboxing on Linux before, you will immediately notice the caveat of this approach: binding the X11 socket. It effectively gives access to any application running under X11 both on the host and other containers. Running Wayland compositor on host gives a lot in terms of isolation here. Also, if you are sure that you won’t be running any X11 applications inside the container, you may skip mounting the X11 socket.
Another issue is bind mounting Wayland socket directly. It is not as bad as X11, but some proxy compositor (like Sommelier) would be preferable.
To properly support graphics, we also need OpenGL support (3).
We are enabling it and copying extraPackages from the host configuration.
This will ensure that we have all the necessary libraries inside the container.
Next (3), we’re adding new packages to the systemPackages list.
As I mentioned earlier, my favorite IDE is IntelliJ Idea, so I used the community edition as an example.
In addition, Alacritty is provided inside the container from home.nix, so we have both X11 (Idea) and Wayland (Alacritty) applications available.
Last (4), there is environment variables configuration.
Most of them are needed for proper Wayland handling (especially WAYLAND_DISPLAY) and X11 (DISPLAY).
_JAVA_AWT_WM_NONREPARENTING is needed for IntelliJ to work under Sway.
Now it’s time to try this new thing! Accessing shell inside the container will be a bit different now:
# Start the container:
systemctl start container@graphicalExample.service
# Enter shell inside container:
machinectl shell myuser@graphicalExample /usr/bin/env bash --login
You can see that the login shell is forced here.
This is necessary for Home Manager’s sessionVariables configuration to be applied.
Inside the container, you can try running both alacritty and idea-community.
Each of them should work as expected, which means we have all basics covered. ;-)
The XDG_RUNTIME_DIR’s permission 🔗
An unfortunate consequence of bind mounting directories to the /run/user/${userUid} is the forced creation of this directory during container initialization.
In normal circumstances, this is handled by the systemd upon user login.
However, our use-case container runtime (systemd-nspawn is container runtime behind the NixOS containers) has to create it to mount sockets.
There are two possible ways to solve this:
- Fix permissions manually during the container’s startup.
- Mount sockets after the container’s creation.
systemd-nspawnprovides such functionality.
In my opinion, the first option is more straightforward, so I will show it here. All we have to do is create an additional systemd unit that will change the permissions of this directory. The code looks like this:
{ config, pkgs, lib, ... }:

# ...

{
  # ...

  containers.graphicalExample = let
    hostCfg = config;
    userName = "myuser";
    userUid = hostCfg.users.users."${userName}".uid;
  in {
    # ...

    config = {
      # ...

      systemd.services.fix-run-permission = {
        script = ''
          #!${pkgs.stdenv.shell}
          set -euo pipefail

          chown ${userName}:users /run/user/${toString userUid}
          chmod u=rwx /run/user/${toString userUid}
        '';
        wantedBy = [ "multi-user.target" ];
        serviceConfig = {
          Type = "oneshot";
        };
      };
    };
  };
}
GPU acceleration 🔗
In the configuration’s current state, we can run graphical applications.
However, you can notice that there is no hardware acceleration inside the container!
When we look into the output of glxinfo (I’ve created a separate container for this purpose with the glxinfo installed), we see the following result:
...
Extended renderer info (GLX_MESA_query_renderer):
    Vendor: Mesa/X.org (0xffffffff)
    Device: llvmpipe (LLVM 11.1.0, 256 bits) (0xffffffff)
    Version: 21.1.4
    Accelerated: no
...
It tells us that the llvmpipe driver is in use.
The llvmpipe driver is a software rasterizer.
To get hardware acceleration, we need to share DRI devices.
These are living under /dev/dri directory.
Sharing DRI devices to the container opens a new attack area. I haven’t researched this, but I don’t see how we could stop the container from reading screen buffer if it has access to the GPU. Thus, I would be against sharing /dev/dri in the general case.
If you are still interested, here is code that will share /dev/dri to the container:
{ config, pkgs, lib, ... }:

{
  # ...
  containers.graphicalExample = let
    # ...
  in {
    bindMounts = {
      dri = rec {
        hostPath = "/dev/dri";
        mountPoint = hostPath;
      };
    };

    # ...
  };
}
After binding the DRI device to the container, you will see output from the glxinfo, which will look like this:
...
Extended renderer info (GLX_MESA_query_renderer):
    Vendor: AMD (0x1002)
    Device: Radeon RX550/550 Series (POLARIS12, DRM 3.40.0, 5.10.57, LLVM 11.1.0) (0x699f)
    Version: 21.1.4
    Accelerated: yes
...
I am yet to research ways to virtualize a GPU on top of a hardware GPU with consumer-grade hardware.
I know that the QEMU does something similar with virtio-gpu/virgl.
Nonetheless, I’ve noticed the lack of hardware acceleration by an accident (smooth scrolling in the Visual Studio Code doesn’t work without it), so currently, I’m working with a software rasterizer.
Note for the Nvidia users with proprietary drivers: I have not tested them, but I’m pretty confident that something will break. My suggestion is to use the open-source drivers and, preferably, hardware with proper support from its company.
There are still some usability improvements we can make.
After all, it’s pretty tedious to manually run systemctl or machinectl commands each time you want to run something inside a container.
Application launcher 🔗
It would be perfect if the application inside a specific container could be run using your application launcher of choice. While it won’t be as straightforward as running applications on host — we have to specify in which container we want to run it — it still will be a significant UX improvement. For the article’s purposes, I will be using wofi. It is similar to rofi but built for Wayland.
First, we need to add an application launcher to the home.nix configuration.
It is pretty simple:
{ pkgs, ... }:

{
  # ...
  wayland.windowManager.sway = {
    # ...
    config = {
      # ...

      # Application launcher.
      menu = "${pkgs.wofi}/bin/wofi --show run";

      window.titlebar = true;
    };
  };

  # ...
}
You can check if it’s working by pressing Mod1+d / Alt+d inside the virtual machine.
I also added the window.titlebar property, because titlebars disappeared for some reason after changing the menu’s value.
Kind of magic I don’t want to investigate.
Next, add a graphical polkit agent to be able to authenticate.
With container configuration, we can affect the system in many ways (i.e., mount root directory inside a container), requiring elevated privileges.
I will add it as a user systemd service inside the home-host.nix:
{ pkgs, ... }:

{
  # ...

  systemd.user.services.polkit-agent = {
    Unit = {
      Description = "Runs polkit authentication agent";
      PartOf = "graphical-session.target";
    };

    Install = {
      WantedBy = ["graphical-session.target"];
    };

    Service = {
      ExecStart = "${pkgs.polkit_gnome}/libexec/polkit-gnome-authentication-agent-1";
      RestartSec = 5;
      Restart = "always";
    };
  };
}
Finally, let’s prepare an executable for running things inside the container.
I will define it in desktop-host.nix:
{ config, pkgs, lib, ... }:

# ...
{
  # ...

  environment.systemPackages = let
    userName = "myuser";
    containerName = "graphicalExample";
    hostLauncher = pkgs.writeScriptBin "${containerName}-launcher" ''
      #!${pkgs.stdenv.shell}
      set -euo pipefail

      if [[ "$(systemctl is-active container@${containerName}.service)" != "active" ]]; then
        systemctl start container@${containerName}.service
      fi

      exec machinectl shell ${userName}@${containerName} /usr/bin/env bash --login -c "exec ${pkgs.wofi}/bin/wofi --show run"
    '';
  in [ hostLauncher ];
}
It will start the container if it is not running and then execute wofi inside.
You can test it in the virtual machine by searching for graphicalExample-launcher in the host’s wofi and then running it.
It would be better to use actual desktop items.
However, when I tried them, they messed something with environment variables inside the container.
As a result, it should be possible to use the desktop item as launcher on the host almost directly but, using it inside the container would require some debugging.
Anyway, I still consider it a significant UX improvement over manually calling systemctl and machinectl.
Sharing files between the host and a container 🔗
For containers to be of any use, we need to share meaningful data with them.
We can use mentioned earlier bindMounts.
It would allow us to, for example, bind ~/Projects/first to ~/Project inside the container.
Another approach is to leverage the knowledge that containers’ data resides in /var/lib/containers.
We can then issue on the host command like:
git clone ~/Projects/first /var/lib/containers/firstContainer/home/myuser/Project
Although using separate git-dir and work-tree might be more convenient here.4
NixOS config usability 🔗
There is a bit of boilerplate code around container configuration. This is not a problem as long as there is only one container. However, the point was to have multiple isolated environments. Personally, I have created a custom Nix module providing the necessary functionality. Unfortunately, it is ugly and buggy, so I think it will be better for the NixOS community if I won’t share it (Maybe one day I will decide to publish it as a warning.)
Anyway, in principle, its usage looks like this:
{ pkgs, ... }:

{
  betterContainers = rec {
    base = {
      userName = "user";
      desktopLauncher = "${pkgs.wofi}/bin/wofi --show run";

      config = {
        # A shared configuration for all containers.
      };
    };

    containers = let
      # Traits with a shared configuration. Implementation is skipped.
      baseDevTrait = { };
      jvmDevTrait = {  };
      golangDevTrait = { };
      nodejsDevTrait = { };

      # Function to provide FHS with all packages inside the environment.
      # Useful when working on projects without Nix support.
      # Provides `enter-fhs` binary, which enters the FHS environment.
      #
      # Implementation is skipped.
      withFhs = traits: { };

      # Templates
      webdevTemplate = withFhs [baseDevTrait golangDevTrait jvmDevTrait nodejsDevTrait];
    in {
      someWebProject = {
        desktopRunner = "enter-fhs -c \"${base.desktopRunner}\"";
        config = webdevTemplate;
      };

      blog.config = withFhs [
        jvmDevTrait
        golangDevTrait
        {
          home-manager.users."${base.userName}".home.packages = [ pkgs.hugo ];
        }
      ];
    };
  };
}
systemd-nspawn 🔗
NixOS’s declarative containers run on top of systemd-nspawn. Details of this container management tool are definitely out of the scope of this article. However, I think it provides several exciting capabilities.
Let’s start with the systemd-cgls command.
It will show control groups in the system — including a group created for a container.
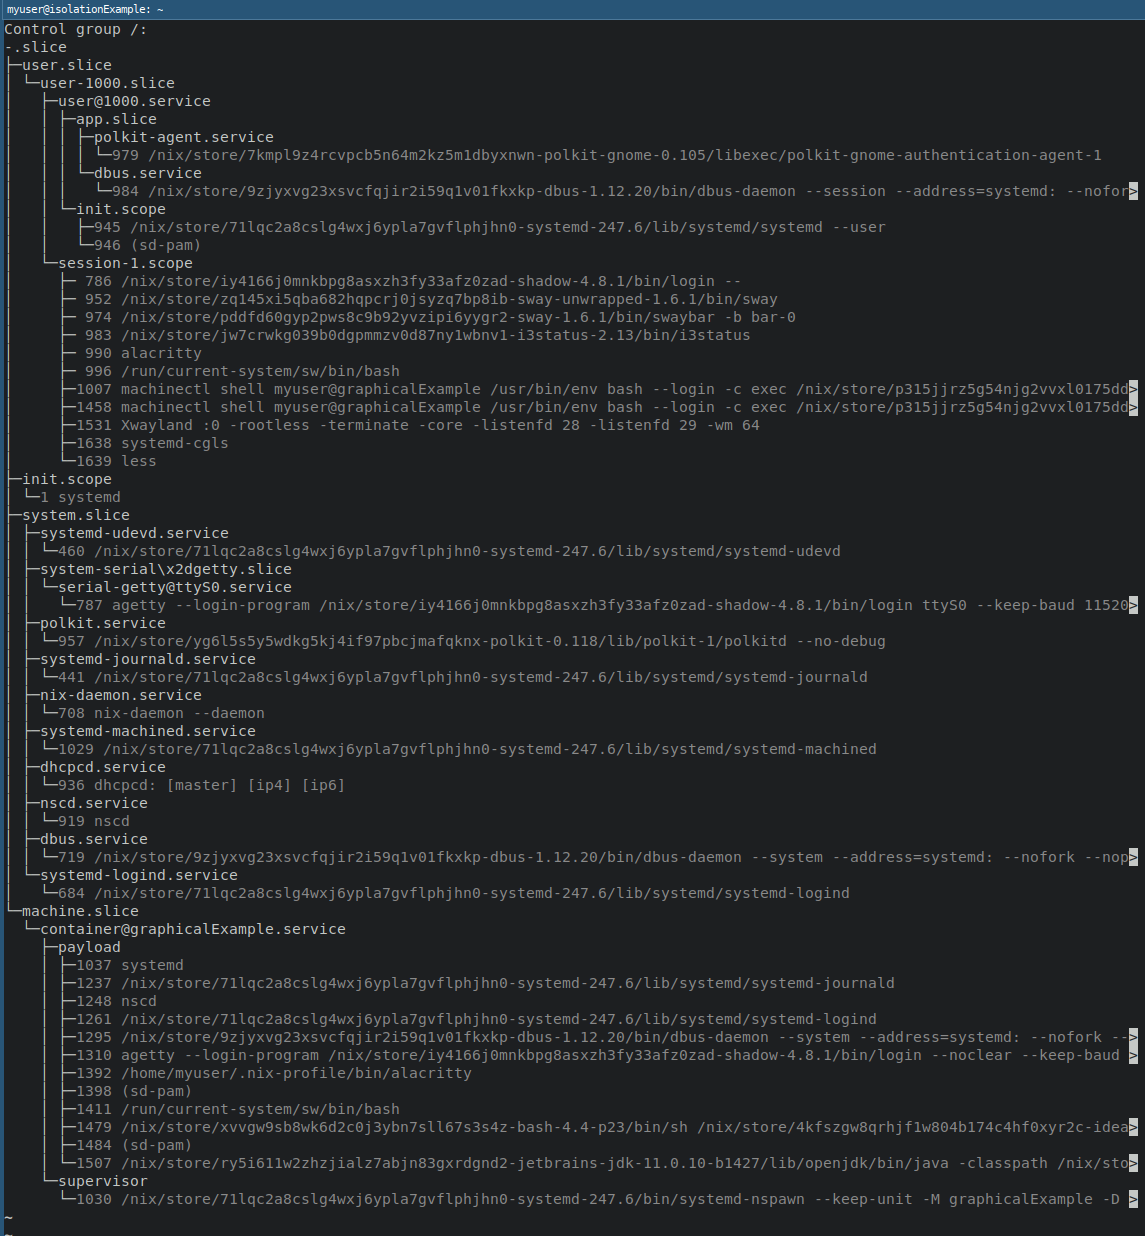
In the image, we see the machine.slice and nested container@graphicalExample.service.
The nested entry is our container!
Using systemd-cgls, we can check what processes are running inside the container without explicitly running anything inside the container.
Another great tool is the systemd-cgtop.
While the systemd-cgls gives us an excellent overview of what is running inside a container, the cgtop variant shows us the resource usage of each control group.
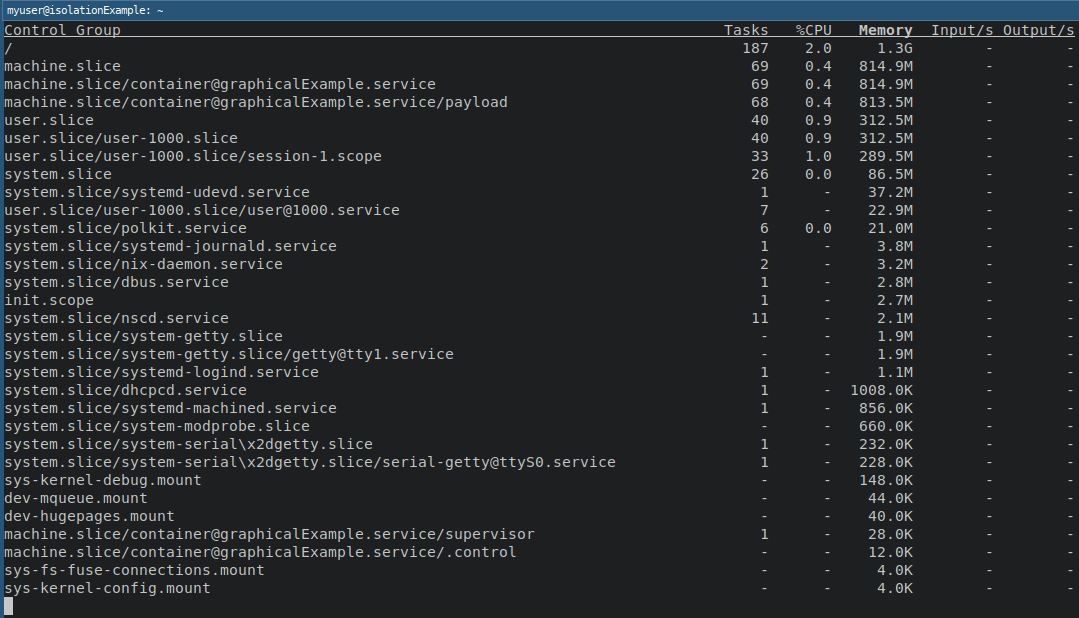
In the picture above, we see the output of systemd-cgtop --order=memory.
Unsurprisingly, the graphicalExample container is using the majority of memory.
This usage might have something to do with IntelliJ running in the background. ;-)
Last but not least: the -M / --machine switch.
It works, for example, with systemctl and journalctl.
We use it to specify the machine (in our case: a container) to work with.
In the case of the journalctl the command may look like (as root):
journalctl -M graphicalExample
The result will be similar to the traditional journalctl.
However, in this case we will see the logs from the container.
Conclusion 🔗
The final source code for the provided example can be found in the repository on Github. It is the same code as presented in the article. There are separate commits for different stages of the blog post, so you may want to look into diffs if applied changes are not clear from the text.
As I mentioned initially: I’m not a security expert, so you must decide if this solution fits your security model. To make it easier for you, I tried to emphasize obvious security issues (shared X11 socket, to some extent: shared Wayland socket, shared Nix store). There are also possible improvements/considerations not mentioned yet:
- Network isolation: you can define a separate network for declarative containers, even to the point of completely disabling networking for the container.
- Syscall filtering: as far as I know,
systemd-nspawn(container manager used internally by NixOS Containers) does some syscall filtering. I have not investigated to what extent.
I hope this post was helpful or at least interesting. ;-)
I explicitly mentioned IntelliJ Idea because I also tried Visual Studio Code, and the experience was way better under
virtio-gputhan IJ. ↩︎If not, you might be interested in reading NixOS Manual and Nix Pills. ↩︎
I’m aware that you can provide in
configuration.nixlist of packages per user but, there is no option to create appropriate dotfiles on per-user basis. ↩︎Keep git-dir on the host and work-dir in the container, so the container does not issue any git commands and won’t add anything malicious to git hooks. As a con, you will lose git integration in the IDE. There is no free lunch. ↩︎